

|
|
|
| How To Decorate Your Baby's Nursery Your
baby is on her way (or, she's already here!) and you want her to have
a wonderful nursery to enjoy. No matter what your budget, this step-by-step
guide will work for you! We go through planning as well as setting up
the nursery. Don't just go and start spending money on cute items for
baby's room - have a plan first! You'll save money and be happier with
the result. There are many ways to plan the decorative look of a room,
this is the order we suggest and cover in this article: Your
baby is on her way (or, she's already here!) and you want her to have
a wonderful nursery to enjoy. No matter what your budget, this step-by-step
guide will work for you! We go through planning as well as setting up
the nursery. Don't just go and start spending money on cute items for
baby's room - have a plan first! You'll save money and be happier with
the result. There are many ways to plan the decorative look of a room,
this is the order we suggest and cover in this article:1. Colors: Choose your colors (we suggest basing the color scheme on a crib bedding set you love) 2. Baby Furniture: Select the furniture that will go best with your chosen colors and the style of the bedroom 3. Paint: Select a paint color that complements your bedding colors and furniture 4. Window Coverings: Select and hang the window treatments that go with your colors and the wall colors. 5. Setup: Assemble all furniture, clean your bedding and dress the room! 6. Decorate: Add all the "frosting" to the room Choose Colors For Your Nursery Choosing Your Baby's Furniture Crib: Once you have selected your crib bedding set and colors for the baby's room, it is time to select the furniture! Be sure to choose furniture that is both safe, meeting all of today's safety standards, and, that will complement your room decor! Another consideration: will you only be using the crib while baby is small? Or, do you want a crib that transforms to a toddler bed, and, later, to a twin or full size bed for your child? The crib shown above is a convertible crib. Sold 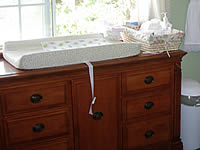 separately
from the crib are bed rails that can be used to transform it into a full
size bed. The rail necessary to turn it into a toddler's bed came with
the crib. separately
from the crib are bed rails that can be used to transform it into a full
size bed. The rail necessary to turn it into a toddler's bed came with
the crib.Changing Table: We suggest selecting a crib/changing table/dresser set that matches and meets all your needs. When selecting the set, be sure to verify that the changing table is large enough, and has space for your changing supplies, diapers, wipes, diaper cream, hand sanitizer, etc. (as shown in the photo on the left). You can also find changing tables that double as dressers, as does the one shown. These can come in quite handy as baby gets older...what was once her changing area now becomes an attractive dresser for her clothes. Painting the Nursery As with any paint today, be sure to select one that is not lead-based. The paint color should be soothing and complement the bedding colors you have chosen. Also keep in mind, will baby be using this room as she gets older? Will this color be suitable for her as an 8 year old? As a 12 year old? (Of course, by then, you might want to re-paint the room anyway). Also keep in mind the window treatments you are using with your bedding set. Will they look good next to the paint color you've chosen? Below we show two areas of a nursery before and after being painted. This room had bright red paint on the walls. it was very important to properly prime the walls before painting with the green color. It is suggested that a tinted primer be used on the red paint (or any bright or dark color) before applying your nursery color.
Hanging the Curtains in Your Baby's Room Assemble and Place the Baby Furniture
See More Nursery Topics: |
 You
may plan on using this room for the nursery only as long as your baby
is a baby...or, you may plan on this room also being her room when she
is a toddler. If that is the case, keep that in mind when you select your
colors. Choose something that also works for a toddler, that will save
you time and money in paint, furniture and bedding later on! Since this
is a bedroom, we suggest keeping the main colors calming, with accents
of stronger color for interest for your baby (they love contrast!)
You
may plan on using this room for the nursery only as long as your baby
is a baby...or, you may plan on this room also being her room when she
is a toddler. If that is the case, keep that in mind when you select your
colors. Choose something that also works for a toddler, that will save
you time and money in paint, furniture and bedding later on! Since this
is a bedroom, we suggest keeping the main colors calming, with accents
of stronger color for interest for your baby (they love contrast!)


 Now
that your nursery is painted, and the paint has dried, it is time to hang
your curtains! There are many options available, valences, panels, sheers,
blinds...it's up to you. Before you hang your curtains, be sure you have
the correct window treatment hardware, and that it is the correct size.
Then, measure your windows and decide where you will install the hardware,
and, how the curtains will look on the hardware (will they touch the floor?
are they far enough over?) BEFORE you drill any holes in the wall! Also,
be sure you have the hardware in line with each other on every window,
so that, as you look across the room, all the window treatments are at
the same level to the eye.
Now
that your nursery is painted, and the paint has dried, it is time to hang
your curtains! There are many options available, valences, panels, sheers,
blinds...it's up to you. Before you hang your curtains, be sure you have
the correct window treatment hardware, and that it is the correct size.
Then, measure your windows and decide where you will install the hardware,
and, how the curtains will look on the hardware (will they touch the floor?
are they far enough over?) BEFORE you drill any holes in the wall! Also,
be sure you have the hardware in line with each other on every window,
so that, as you look across the room, all the window treatments are at
the same level to the eye. Next,
assemble the baby furniture (unless your's is already put together). Always
READ the instructions FIRST. No matter how much you love a challenge,
read them first, it will save you time, and, might save your furniture!
(We say this from experience). AFTER you have read the directions, and
the items are assembled, place them in your baby's room. Keep in mind,
you won't want your crib near things baby can reach and grab, or where
anything could fall on baby. Also, you want your changing table to be
away from things baby can reach or can pull on herself. Beware of placing
furniture near windows, later, when baby can stand, if you turn for a
second (ALWAYS keep a hand and an eye on baby), baby could fall out the
window.
Next,
assemble the baby furniture (unless your's is already put together). Always
READ the instructions FIRST. No matter how much you love a challenge,
read them first, it will save you time, and, might save your furniture!
(We say this from experience). AFTER you have read the directions, and
the items are assembled, place them in your baby's room. Keep in mind,
you won't want your crib near things baby can reach and grab, or where
anything could fall on baby. Also, you want your changing table to be
away from things baby can reach or can pull on herself. Beware of placing
furniture near windows, later, when baby can stand, if you turn for a
second (ALWAYS keep a hand and an eye on baby), baby could fall out the
window.  Add
the Frosting!
Add
the Frosting!